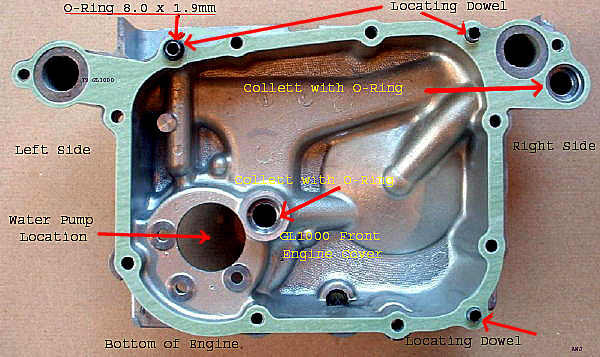
“Prepped” Front Cover – viewed from rear. Note crucial by-pass oring detailed below.
(Special thanks to Art Jernberg for improving the captions above.)
Replacing the water pump on an early ‘Wing is one of my least favorite tasks! It’s not terribly difficult, but it’s time-consuming and aggravating…especially on early models with cheesy Phillips head screws holding the front cover on.
First – what’s actually going on when you water pump develops a leak?
Per Pete Boody:
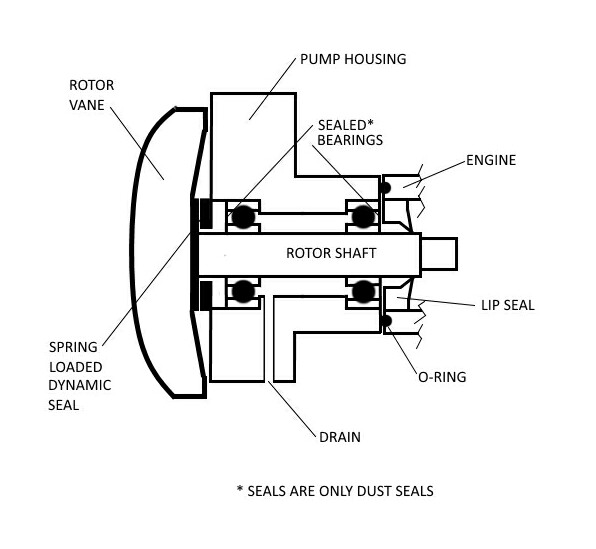
“Looking at the sketch (above) you will see three important seals to keep water from entering the oil and oil from entering the water.
They are the dynamic seal behind the rotor vane shaft, the o-ring at the rear of the pump/engine and the lip seal inside the oil pump shaft opening.
As you can see if the dynamic seal fails the drain port will drip coolant and as explained the “seals” in the ball bearings are at best, just dust seals in this pressurised application so these bearing seals will invert and allow the coolant/oil to pass out of the drip port.
I always recommend that at the first sign of coolant that drips, you should waste no time in ordering the correct Honda parts for a complete water pump change and git-r-done. Putting it off until you see oil is way beyond reason and the possible damage to the engine and front transmission cover that could be extensive.”
A water pump replacement is in order when:
1. Coolant or oil leaks from the telltale “weep” hole beneath the water pump. Leak modes are expertly explained here by Octane.
2. The water pump makes scraping, grinding or howling noises that rise and fall with rpms. Be sure to eliminate the timing belt tension idlers as the source of potential noises first.
General advice:
1. Don’t attempt to rebuild your old pump. It’s possible, but it’s a treacherous path with limited economic benefit. New pumps are readily available from Honda at a reasonable price. That’s what I recommend.
2. There are some Chinese-made aftermarket water pumps available in the marketplace. Based on owner reports I receive, these have some reliability issues.
3. Review the excellent online materials at Naked GoldWing’s Shop Talk section for very helpful tutorials created by Octane and Roady!
4. On early models, the radiator will have to come out for access to the Phillips head screws retaining the front cover. On later models, you can do the task without radiator removal, but that creates nearly as much hassle as it avoids. I usually pull the radiator…especially if other maintenance is needed.
5. Strongly consider timing belt and radiator hose replacement as part of this project. You’ve already done half of that work already!
6. A handheld impact driver is mandatory to remove the Phillips-head fasteners used to secure the front cover on early models. You will need an assortment of extensions and properly sized #3 Phillips bits to work around frame members. A “wobble” extension helps a bit. One fastener is best reached by a small vice grip.
7. Whacking with an impact driver and a fresh Phillips bit hardly ever fails. But, if a screw stymies you, try Howard Halasz’s Bingo Method:
a. Place a flat head drift or punch on the screw head and strike the opposite end of the punch with a steel head hammer. A piece of 5/16″ steel round bar, approx. 8″ long, makes a near perfect punch for this purpose.
b. Strike the punch hard enough to slightly deform the cross point on the screw head.
c. Then place the screwdriver on the screw head.
d. Strike the handle end of the screwdriver with your hammer. This will reform the cross point and also break any corrosion buildup on the screw threads. BINGO!! Now the screw will come out rather easily!
Note from Pete Boody:
“Another mechanical benefit of a strategic smack with a solid steel punch is that it slightly compresses and deforms the aluminum cover directly beneath the screw as well as the seal. Because some of the screws are directly behind the frame cross bar tube a shaped tool can also work. The one that I use has been ground to miss the tube allowing the impact to be straight on.”
8. If the impact driver and Howard’s Bingo Method fail to yield good results (unlikely), the best course is to remove the head of the offending screw so you can get the cover off. The best way to get the head off is with a small cut-off wheel on a Dremel. A hand held jab saw (hacksaw blade with a handle one end) or a good chisel will also work. Once you get the head of the screw off and remove the front cover, that takes the tension off the screw threads. There should be a small portion sticking out of the case that you can grab with Vice-grips. The screw remnant should come out easily now. If it doesn’t, you should heat it with a propane torch. A few heat cycles will usually free it. Worst case scenario would be the Easy-Out method, but at least you now have better access with the cover out of the way.
9. Unless you have a show bike, strongly consider using new hex-head fasteners to replace those Phillips-head fasteners. If you stick with the Phillips-head fasteners, use new ones. Regardless, an anti-seize compound is advised during reassembly.
10. In the past, I’ve used aftermarket seal kits (such as those marketed under the K&L brand) with good results. Recently, I did a water pump replacement on my ’75 show bike. During that project, I discovered that several of the K&L orings were significantly under-sized…particularly the large oring that seals the main body of the pump to the front cover (spec = 56 x 2.4mm). Failure of that oring can lead to coolant loss as Octane explains here. Due to that discovery, I went with all OEM orings to be safe. I recommend the same for anyone who desires a “once and done” repair.
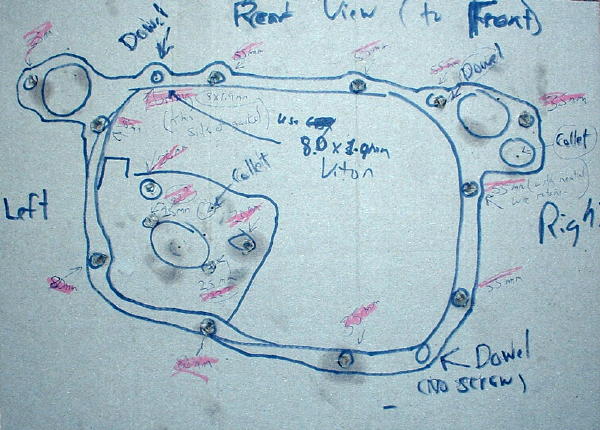
11. Like others, I use a cardboard template to organize the bolts, dowels, collets and orings during disassembly. Here’s mine:
Randakk’s Front Cover / Water Pump Organizing Template
(as viewed from rear)
Impetus for this Tech Tip:
Recently, I assisted a customer who had a strange cooling system problem. The symptoms were:
1. Slow lose of coolant with no obvious, external leak evidence.
2. No “sweet” smell of coolant burnt through combustion.
3. No compression problems detected via standard or “leak down” compression tests.
4. Very slow rise in oil sump level and evidence of coolant contamination in the oil.
The first thoughts that came to my mind were rather catastrophic: cracked block or cylinder head. But, the owner’s report indicated that this problem had existed ever since he got the bike and there was history to suggest the bike had a water pump replaced just prior to his acquisition.
Long story short…
We discovered that a vital oring had been omitted by the “mechanic” during the prior water pump replacement!
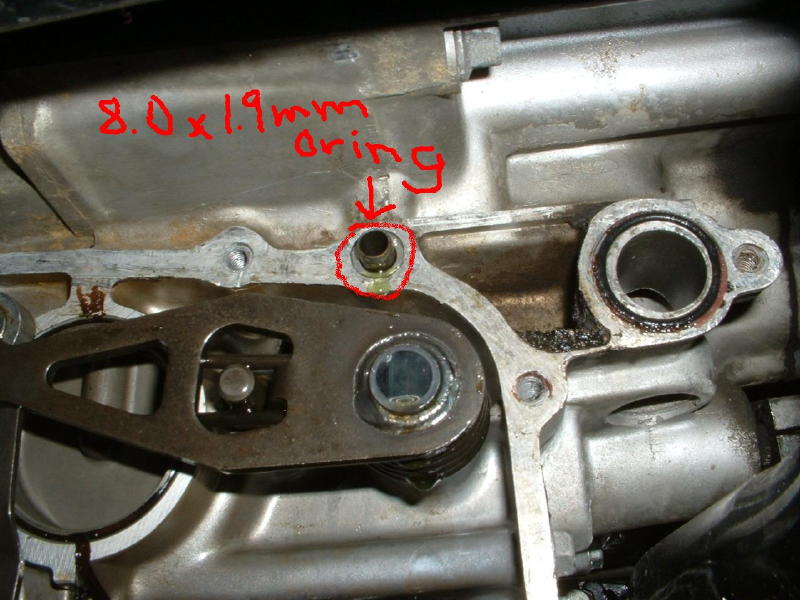
Location of Water Pump By-pass Oring
(viewed from front)
This missing oring measures 8.0 x 1.9mm. It’s purpose is to seal the by-pass channel used to circulate coolant while the engine is cold (before the thermostat opens). If this oring is left out, there is a straight path for coolant to mix with engine oil in the lower portion of the front cover!
This was an easy fix once the diagnosis was made. Fortunately, it was caught early before certain engine damage occurred.
Moral:
Be sure all required orings are in place prior to buttoning-up! Take your time and do this project carefully!


Im having trouble installing a new water pump on my 75 GL1000 rebuild. I can fit the fan into the block past the main O-ring, but the fins scrape against it’s water inlet housing. Anyone know what im doing wrong
1) There are no “Phillips-head fasteners” on Hondas or any other Japanese product. They all have Japan Industrial Standard heads, a similar looking but very different (& far superior) crosspoint screw head & driver design.
Using a Phillips driver is the main cause of ruined JIS screw heads.
2) The water pump assembly consists of the housing, 2 bearings, a short shaft with the impeller on the end and the same mechanical seal used in GL500 and CX/GL650 engines. I replaced the bearings and mechanical seal in my water pump for about 1/3 the cost of buying a new assembly and it works perfectly, saving myself approx. $100 CAD.
This can be done by anyone with a reasonable level of mechanical skill & understanding of how things fit together so there is no reason to recommend against doing it.
Just bought my first bike, a 78 GL1000. I’m replacing the water pump because I had some coolant leaking through the weep hole so I’m hoping this fixes it. I have a few seized screws on the transmission cover though, they’re Allen heads and I don’t want to strip them. Any ideas on how to remove them or a more useful tool? Thanks
A proper sized wrench with strong sharp contact points and a cab of PB Blaster go a long way, good luck!
I’m on my 4 th a temp 2 after market pumps ,I cut 1 o ring on base of pump and block, replace oil seal twice Still have oil leak at weep hole Any ideals. .im getting good at take cover off
Hi ,I have the same problem after fitting the new pump.After dismantling I have notice the oil seepage through three mounting bolts from inside crancase.
I not use the old flat washer and probably was made from aluminium and works as seal.
You do not recommend the K & L water pump gasket set (comment from November 3, 2017), but the kit you sell has the same part number as the K & L kit. KL15-4340
What is the difference between yours and the other brand?
Is there an easy way to get the locating dowels out. Mine are seized in from age but their presence makes cleaning the surfaces very difficult. I know I can get replacements if I have to destroy them in the process.
If they are stuck, they have to be “sacrificed” and replaced with new dowels. Usually, you can grab them with Vice-Grips and twist them out. Obviously that ruins them.
Thank you for that. I learned elsewhere that they come out easier, and you ‘may’ be able to re-use them, by putting a drill bit just about the same size as the hole in the dowel, in the dowel and then working them out with pliers of some sort. It worked well for me and while I intend to replace them with new I bet I could re-use them as is.
Yes. It’s always best to replace these with new when dowels if possible.
I am in the process of checking out my water pump. With the covers off, the impellers look fine and there is no side to side wobble, but the impellers do not turn when I try to rotate them. Is this normal or should they rotate freely?
No. The pump impeller is connected directly to the engine via a chain driven jackshaft from the rear of the engine.
Thank you for that too. So if I turn the crankshaft the impeller should move as well?
Yes.
About that o ring that the last guy left out. I been trying to find 8.0×1.9mm but my local Honda parts dealers are no help. I have found 8.0×2 and 8.0×2.5 will anyone of those work or should I keep searching. Thank you for your help
Steve,
The 8.0mm x 2.0mm should work that is only .004″ of an inch difference in O-Ring thickness.
Please tell me if I should use any kind of sealer on the front cover or just a dry gasket? Thanks. Dave
If you are using an OEM Honda gasket …then no sealer is required. For all others, I recommend ThreeBond 1211 sealant.
I got it running tonight and I have oil dripping from the weep hole under the water pump. I used a new aftermarket water pump and a gasket set from K and L. I put the oil in last week and had NO oil leaks until I started it tonight.
You need to revisit your work. I do not recommend aftermarket water pumps or the K&L gasket set.
I’m sure glad I found your post because I was going to rebuild my old pump. I checked into buying a new one, and I did find one reasonably priced. I already switched them out and now I can go fishing for the rest of the day. Thanks to you I’m not stuck in the garage the rest of the day!
Randall, I found the number in my book of notes….NAPA 7733. It will make both upper and lower pieces.
Thank you
Correct. Here is the “List of Reasonable Parts Substitutions for GL1000:” http://www.randakksblog.com/?p=1526
Is there NAPA part number that radiator hoses can be fabricated from?
I seem to remember coming across it once but age is keeping me from remembering where.
Thank you