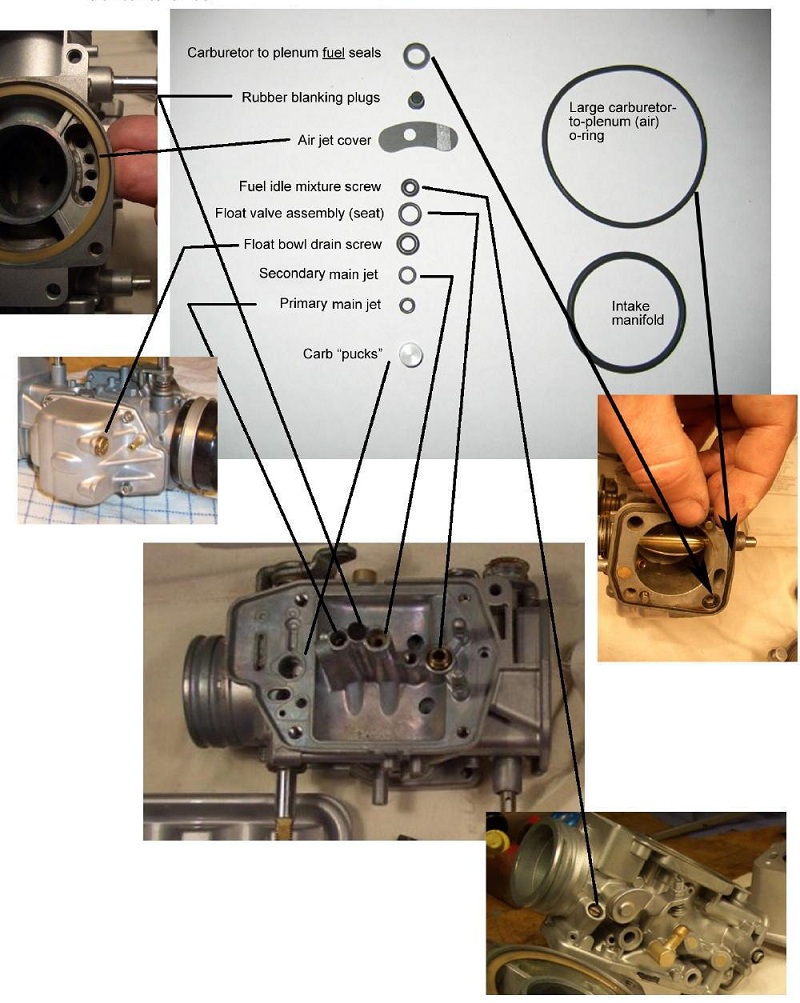
Note: The graphic for this Tech Tip is provided courtesy of Tom Thomas of Austell, GA.
My GL1000 carb video goes into great detail on the placement of these bits, but the nice graphic below provided by Tom Thomas is a handy quick reference.
Thanks Tom!
Honda GL1000 O-ring sizes :
- Fuel (idle) mixture screw – 2.8 x 1.9 mm
- Float valve assembly – (seat) – 5.7 x 1.3 mm
- Float bowl drain screw – 4.47 x 1.78 mm
- Primary main jet – 3.2 x 1.1 mm
- Secondary main jet – 4.2 x 1.1 mm
- Large carb-to-plenum (air) O-ring – 60.0 x 2.1 mm (this one looks “square” on the Honda parts diagram)
- Intake manifold – 40.0 x 2.6 mm
All Randakk’s Master Carb Overhaul Kits® contain Viton® orings exclusively.


After rebuild of my 1977 Goldwing carburetors, using your kit, I still had problems with very rough operation after the bike is warmed up. After checking timing belts, valve clearance, compression, ignition timing, I pulled the carburetors again (and again and again like many others before me).
I have noticed that the tiny Viton O rings sealing some of the primary fuel jets are beat up to the point they do not provide a tight seal. The O rings are the ones at the “top” of the jet nearest the bowl side.
My question for you is whether a bad O ring between the sides of the fuel jets and the bowl could be the cause of the rough running?
I have an 81 gl1100 I am doing a rebuild of the bike which was my dad’s.
He has passed and was cremated. Once I get the bike completed I will take him for his final ride before we spread his ashes.
I am having problems with air coming back into the gas tank in large burps.
I have completely rebuilt the carbs with your kit. Installed your premium gas filter. Rebuilt the gas shut off valve, new fuel lines and replaced the fuel pump with a new Honda fuel pump. I have taken apart the gas cap and cleaned but at this point while synchronizing I have the cap off with a towel over the gas tank.
I have been fighting the idle on the carbs for weeks before discovering the burping of air into the gas tank. I finally was able to synchronize the carbs and adjust the idle screws to get good vacuum readings on all 4 carbs with the gas cap off.
I have no gas leaks with the bike running or off. The bike has always been garaged, very well maintained since new and only has 59k for miles.
I am having a hard time visualizing how I can be getting air back through the fuel lines since the carbs would be under a vacuum at the point where the fuel atomizes and I have good vacuum readings at all 4 carbs.
I was hoping with all the experience you guys have you might have come across this before and know a cure. Thanks in advance. Brad
Very helpful graphic. I did have to learn the hard way that you don’t want to roll the fuel idle mixture screw O ring into place. I broke two before I figured out that was the wrong way to do it. As it was quite cold in my shop when I did the carbs I did find it helped to soak the idle screw O rings in hot water – it seemed to give them a little more stretch allowing me to ease them into their groove. Thanks again for your kindness in supplying replacement O rings, especially as the breakage came out of my bad technique, not the quality of materials supplied in your Master Carb Overhaul Kit.
Glad to help out. A small smear of Vaseline helps when installing these tough little orings. Randakk