Starter clutch overhaul is an easy, but rather time-consuming task. If you have a starter that won’t engage or disengage reliably, your starter clutch probably needs attention. “Howling” or “screeching” noises from the left, rear side of the engine are other symptoms pointing to starter clutch or starter sprocket issues that require overhaul.
The GL1000 starter clutch is a robust design, but it will complain by “gumming up” in lightly used bikes, bikes that don’t receive frequent oil changes and in bikes that are subjected to frequent short trips. Moral: change your oil regularly and allow the bike to reach full operating temperature every time the engine is started. The reliable signal for that is when the radiator fan cycles on.
Tip: bikes that are regularly ridden at higher rpms generally have few starter clutch issues. Why? This mode of operation benefits oiling in this critical part of the engine. Obviously, personal safety must be paramount when operating at higher rpms!
If your starter clutch is acting up, it’s worth trying a therapeutic Marvel Mystery Oil treatment in your oil before you tackle this project. Here’s how:
1. Drain 1 quart of oil from the crankcase
2. Add 1 quart of MMO.
3. Run this mixture for 2 tanks of gas, then change the oil/filter.
4. Remember, this procedure dilutes the oil, so no heavy loads or high rpms!
If you are lucky, the MMO treatment might restore correct starter clutch function. If not, prepare to “bite the bullet” and read on…
Procedure:
Starter clutch repair is fairly well-covered in workshop manuals, but there are a few “non-intuitive” details that are glossed over. The material below should be helpful to those tackling this task for the first time. I have also included a link to a short video which helps show some of the trickier details.
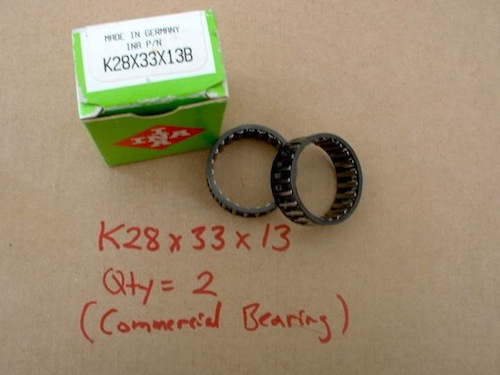
Wash your bike and take a picture that looks just like the one above. Don’t skip this step! A clean bike is much easier and enjoyable to work on. Plus, your probability of success is higher with a clean bike.Consult your manual. Then, do a few things. Next, take a picture that looks just like the one above. Congratulate yourself and open up a barley pop. You have completed the hardest part of the job! Seriously, removing and installing the engine are the great time-consumers on this project. Take your time and work methodically to avoid mistakes. I’ve listed a few helpful engine removal tips in the next few frames.Engine Removal Tip #1 Contrary to the advice in the Honda manual, I always remove the rear wheel prior to engine removal.Engine Removal Tip #2 Remove the thermostat housing before you attempt to remove the upper “shroud.” You will find frustration if your don’t! Engine Removal Tip #3 The lower radiator hose can be left undisturbed by leaving it attached to the radiator and to the lower “gooseneck” at the water pump. I forgot to snap a picture of this tip!Engine Removal Tip #4 Again, contrary to the advice in the Honda manual, I prefer to remove the entire exhaust system as one unit. This protects the possibly fragile header-to-muffler joints. It also means that you won’t need to renew those seals either. This will be a good opportunity to clean and paint the whole system as well.Engine Removal Tip #5 Loosen the nuts securing the final drive unit to the swing arm. This allows the driveshaft to slide back just enough “extra” to simplify clearing the u-joint on the front of the driveshaft.Engine Removal Tip #6 My practice is to create cardboard tracings of the clutch cover gasket and……the rear cover gasket to capture all the hardware in the correct location as each bolt and nut is removed.Remove the access plate on the right rear of the engine (near the fuel pump) to catch……the transfer gear as the rear cover is pulled away. It can remain in the position shown above. No need to remove it from the engine (that would require unnecessary fuel pump removal anyway). Take great care as the rear cover is pulled away…it’s heavy!With the rear cover off, your view should look like the photo above.Remove the main nut securing the alternator. I prefer to hold it with a strap-wrench to prevent damage as shown.Carefully remove the alternator rotor / starter clutch assembly and place on your bench for now. Be aware that it is quite heavy. Dropping it will likely ruin it and probably break a few toes. Typically, a few of the roller, springs and hardened followers will fall to the floor as you remove it, so anticipate that possibility.Don’t lose track of the special splined washer behind the rotor.Above is the main output shaft……workshop manuals typically shows it remaining in the engine (as above) when the rear cover is removed. If so, that’s fine. But, contrary to the manual – it will typically come out with the rear cover instead. That is no problem if it does. Leave it there as removing it from the large bearing in the rear cover can be difficult.On this bike, the bearing under the starter drive sprocket needed attention. It’s always advised to pull this sprocket so you can clean / check the roller bearing. First, remove the retainer at the red arrow. Then remove the splined washer and pull the sprocket away from the engine.You will discover that the bearing retainer rings are very hard to remove. I use a variation of a technique I learned from my Scottish pal John Evans of Wingovations With appropriate eye protection…use a Dremel tool as shown…Cut a narrow access point as shown. Locate this “cut” at one of the shallow depressions and between the retainer’s ends.Now you can easily pry out the retainers.Remove the bearing for cleaning and inspection.Clean and degrease the sprocket. Make sure all the “oiling” holes are clear. On lightly used machines, they are often blocked.Shown above is the OEM Honda starter drive sprocket roller bearing. Sadly, it is currently listed as “discontinued” by Honda.But, two of the commercially available roller bearings shown above will fit perfectly into the same space occupied by the OEM bearing. Thanks again to John Evans of Wingovations for this tip! Lube the bearing(s) with Moly grease, seat the retainers in their grove, then re-install the sprocket onto the engine. Don’t forget the starter drive sprocket retainer and the splined washer!
After the drive sprocket is serviced, don’t forget to replace the special splined thrust washer in the position shown above.Back to the starter clutch assembly….. Don’t bother trying to remove the screws above. The starter clutch housing is pressed into the rotor. Mere humans can’t remove it!Remove the rollers, springs and hardened followers from the clutch. Then clean the entire assembly with de-greaser. Dry thoroughly.The roller cavities must be absolutely clean and smooth! I use a soft brush on a Dremel tool for this task.You might be tempted to re-use the old parts, but I recommend the installation of new rollers….…new springs…and new hardened followers.Thoroughly clean and dry the entire assembly. Lubricate with motor oil, then install the rollers, springs and hardened followers into the starter clutch. The video link on the right should help with the next critical details.This brief video shows a few of the trickier details…especially re-mounting the starter clutch assembly back onto the engine.Above is the part number for the clutch cover oil sealWhile it’s so easy, it’s a good idea to replace this seal during this job.Above is the part number for the kick-start mechanism oil seal used on “early” models.I recommend replacement of this seal whenever you have such easy access.Above is the part number for the main output shaft seal.Replace this seal now if there is any doubt about its condition.Carefully clean all gasket surfaces and install a new rear case gasket. Mount the rear cover making sure all fastening hardware goes in the correct location.Obviously, this is the time to address any needed clutch attention! You will need this clutch cover gasket: 11393-371-306This is a good time to remove and clean the oil pickup screen.Be sure to install in the orientation shown.Likewise remove, clean and check the operation of the neutral switch. The hole in the neutral switch shown above (red arrow) must be installed “down.” The prevents sludge buildup inside the switch.Finish buttoning up the the engine then maneuver it into this position. Then, do a few things to enable you to take the next picture on the right.Ride and enjoy your hard work!
I used to have a Radio Shack (RS) multi-tester the same model as in the image above. That thing lasted for maybe 30 years, and still worked fine when someone stole my toolbox. Seeing old, high quality tools like that makes me wonder if the men growing up today, men in their 20’s and 30’s will love and appreciate the GL1000 series motorcycles for the true wonders they are. I hope so.
Mike,
There of course are several reasons for starter hang up. Yes, starter solenoid is on factor. We suggest you inspect your stater clutch assembly. This may not be releasing properly.
Thank you,
Randakk’s Customer Service Team
Hi, I read an article in goldwingdocs that mention that the holes on the outer side of the starter clutch are to oil the rollers, springs etc. in a picture is showed a wire passing through the clutch from side to side in each cavity.
I am overhauling mine and discovered that the holes are not aligned so the oil will not pass from the outside to the inside of the starter clutch so I am concerned about the rollers lubrication.
Could it be a factory mistake? Does this situation a potential problem?
If yes, how can I correct it.
Thanks for your time.
Hello thanks for responding ….. the problem is that the starter skips … and when disarming the starter clutch I found that I did not have a roller nor the spring did not have anything …. and one of the 3 screws was about to come out …. would that be the problem? Is it necessary to change all new rollers and springs? Thank you!
I removed the lifter plate to gain access to the oil seal. After removing the seal I’ve noticed that the shaft to which the lifter plate is connected has a little play. Is that normal? There is no mention about this in the service manual.
Thank you for showing this procedure! Would you by any chance know how to find the gasket for the clutch lifter cover and the rubber gaskets for the two screws clutch lifter cover? I can’t seem to find a diagram anywhere. Thank you!
Hello,
Great article. I have a 1976 Gl1000, I’m having issue removing the alternator rotor / starter clutch. I’ve already removed the bolt, but can not remove the rotor. Any suggestion?
Generally, they will slide right off. Try whacking with a rubber mallet. If there are any corrosion issues on the splined shaft, you may have to use a puller (carefully) to get it to move. If you go this route, use a quality puller with 3 arms and protect the splined shaft with a hardened washer to prevent damage. Good luck!


I used to have a Radio Shack (RS) multi-tester the same model as in the image above. That thing lasted for maybe 30 years, and still worked fine when someone stole my toolbox. Seeing old, high quality tools like that makes me wonder if the men growing up today, men in their 20’s and 30’s will love and appreciate the GL1000 series motorcycles for the true wonders they are. I hope so.
Would you suggest this as part of preventive maintenance? I have the cover off for a stator replacement and it would be easy to do at this time.
My 1986 Starter at times, will NOT disengage! I turn the key OFF-it continues to turn and the engine is running. Is this a Starter RELAY problem?
Mike,
There of course are several reasons for starter hang up. Yes, starter solenoid is on factor. We suggest you inspect your stater clutch assembly. This may not be releasing properly.
Thank you,
Randakk’s Customer Service Team
Good informative post, Thanks for sharing.
Hi, I read an article in goldwingdocs that mention that the holes on the outer side of the starter clutch are to oil the rollers, springs etc. in a picture is showed a wire passing through the clutch from side to side in each cavity.
I am overhauling mine and discovered that the holes are not aligned so the oil will not pass from the outside to the inside of the starter clutch so I am concerned about the rollers lubrication.
Could it be a factory mistake? Does this situation a potential problem?
If yes, how can I correct it.
Thanks for your time.
Hard to comment on your particular situation without good pictures.
Hello thanks for responding ….. the problem is that the starter skips … and when disarming the starter clutch I found that I did not have a roller nor the spring did not have anything …. and one of the 3 screws was about to come out …. would that be the problem? Is it necessary to change all new rollers and springs? Thank you!
Yes to all your questions! You should investigate where all the shrapnel went …probably at the oil pickup screen.
I removed the lifter plate to gain access to the oil seal. After removing the seal I’ve noticed that the shaft to which the lifter plate is connected has a little play. Is that normal? There is no mention about this in the service manual.
The eccentric normally has quite a bit of ‘free-play.” Be sure the push-rod adjustment is correct.
Thank you for showing this procedure! Would you by any chance know how to find the gasket for the clutch lifter cover and the rubber gaskets for the two screws clutch lifter cover? I can’t seem to find a diagram anywhere. Thank you!
Refer to the resources here: http://www.randakksblog.com/links/
…in the “OEM Parts Vendors & OEM Part Number Lookups” section.
Hello,
Great article. I have a 1976 Gl1000, I’m having issue removing the alternator rotor / starter clutch. I’ve already removed the bolt, but can not remove the rotor. Any suggestion?
Generally, they will slide right off. Try whacking with a rubber mallet. If there are any corrosion issues on the splined shaft, you may have to use a puller (carefully) to get it to move. If you go this route, use a quality puller with 3 arms and protect the splined shaft with a hardened washer to prevent damage. Good luck!