If you own a Honda GL1000 – congratulations! You own one of the best motorcycle designs ever. I’m biased of course, but the well-regarded folks at the Guggenheim Museum selected the original Honda GL1000 as one of the featured machines in the wildly popular Art of the Motorcycle exhibition series.
Honda GL1000 tuning is considered a “black art” by some, but like any other engine tuning challenge, it’s really just a matter of attention to detail.
On a GL1000, it is very critical that your condenser assembly have a solid ground for efficient operation of the wasted spark ignition. This is especially important since the condenser is mounted so much further from the breaker points compared to most engines. Faulty or insufficient condenser ground is a common source of poor idle, high speed miss and shortened breaker point life. Without getting into the complex physics involved, your condenser is an under-appreciated, marvelous device that is very important for proper ignition performance.
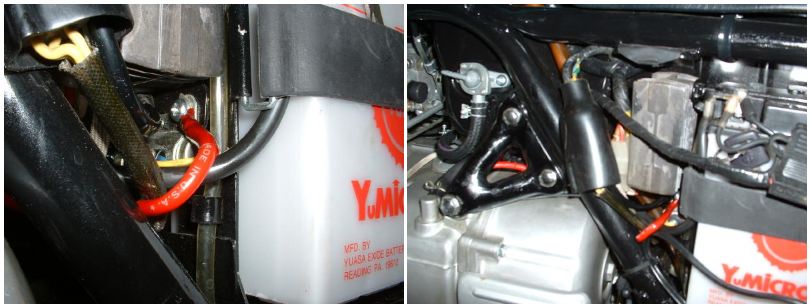
The condenser is connected to the points by a long wiring “pigtail” that attaches to the condenser leads as well as the primary leads from the coil pairs near the condenser’s mounting location to the left side of the battery box. The path to ground for the GL1000’s siamesed condenser assembly is by two 5 mm screws which attach the condenser to the battery box. The battery box is attached to the frame with 3 bolts of it’s own.
Why should you care? If your battery box and / or attachment hardware have any corrosion issues, your ground may be compromised. There are more sophisticated ways to test this ground circuit, but I usually test for this by running a heavy test lead with alligator clips on each end from the condenser body to the negative battery post while the bike in question is idling. If the idle speed and rhythm improve when the test lead is attached, your problem is identified. Clean and scrape as necessary to get a good ground for the condenser.
The best way to cure this issue forever (short of a ground-up restoration), is to install a dedicated ground cable for the condenser. You could run one from the condenser to the negative battery terminal, but I consider it bad practice to clutter up a bike’s wiring with extraneous connections at the battery…it makes battery maintenance harder and no one needs another excuse not to service their battery on a routine basis. A better approach is to run the dedicated ground cable from the condenser to a frame attachment bolt. I like the left side, main hanger bolt. This is the same point where the main chassis ground wire from the battery attaches. You probably need to remove and clean that ground anyway!
Condenser ground fault is major issue on these bikes due to location of the condenser assembly and the distance from the breaker points. In fact, it’s hard to think of any vehicle with a greater distance between these two critical components. The fact that Honda chose to affect the condenser ground through the battery box is not an ideal solution for obvious reasons. On most GL1000s that I see, the battery box needs attention due to the corrosive effects of battery vapor.
I developed this particular fix to help resolve poor idle, high speed miss and shortened point life which is very common on these bikes. I consider this upgrade to be good hygiene and a prudent measure even if you have no present condenser ground issues. I now put this upgrade on all bikes that pass through my shop.
I used to sell these upgrade cables, but stopped since I had supplier hassles and they are so easy to make. All you need is a section of high quality 10 gauge wire, a ring terminal to mount under the left engine hanger (sized to pass a 10 mm bolt) and spade terminal to slide under one of the condenser mounting screws. All connections should be soldered and covered with shrink-wrap. The finished length of the cable should be 12″ overall.
Here are the installation directions I previously shipped with my cables (copyrighted material): click here
Note: The example shown has a red cover to highlight the correct location and routing. I recommend that you use black-cover wire to make this inconspicuous enough for a concours show bike. Highly recommended for all GL1000s running breaker points!


What a simple fix for my tick over problems. Having replaced the corroded battery box some years ago, no longer any rust, A new condenser . I was surprised to read your article. A simple enough mod, I`ll give it ago. Bingo! within half an hour problem solved.