This Tech Tip is provided courtesy of Howard Halasz – noted early ‘Wing Guru. Howard is a frequent contributor of technical columns and other information to GWRRA’s Wing World Magazine. This Tech Tip applies to any 4 cylinder GoldWing (GL1000, GL1100 or GL1200).
“OK! Now that you’ve overhauled your carburetors using your Randakk’s® Master Carb Overhaul Kit and installed them on your Gold Wing, you find out that your Wing now performs better than it ever did since you owned it. You check the lights, turn signals, horn, tachometer, temperature gauge, brakes, and turn signals. Everything looks and sounds great!! Then you notice that your fuel gauge shows EMPTY, although you have a full tank.
The problem could be one of two things. The first thing you might think about is the 7-volt regulator. If that regulator is bad, your temperature and fuel gauge won’t register (see this Tech Tip for details on that problem). But your temperature gauge is working, so what else could go wrong?
More than likely, long term storage has taken its toll on your fuel gauge sending unit. To check the unit, remove the seat and remove the two wires running from the main harness to the sending unit. Turn your ignition key to the on position, and short the two wires together. If the needle on your fuel gauge doesn’t move, check the two wires with the key turned on for the presence of power and ground, and repair any problems in those areas. However, if the needle does deflect towards the full mark when the wires are shorted together, either your sending unit is defective, or the wire terminals weren’t making firm contact. Clean and tighten those connectors, reattach them, and see if the gauge now responds. If not, the sending unit will need to be removed. BUT BEFORE YOU GO TO YOUR FRIENDLY HONDA DEALER TO ORDER A NEW ONE, TRY THE FOLLOWING:
1. Drain your fuel tank down to approximately half full. Removing the sending unit from a full tank can be rather messy and hazardous!!
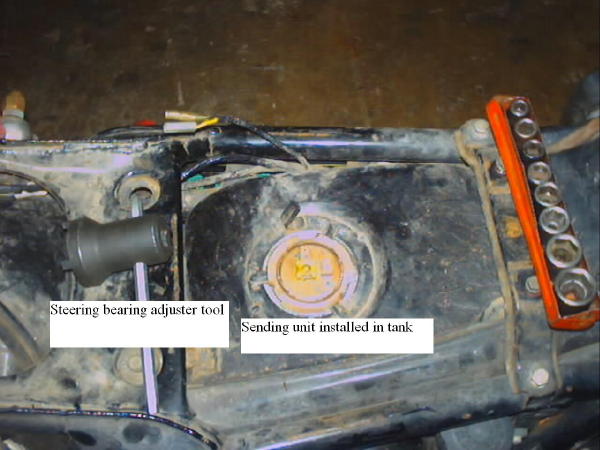
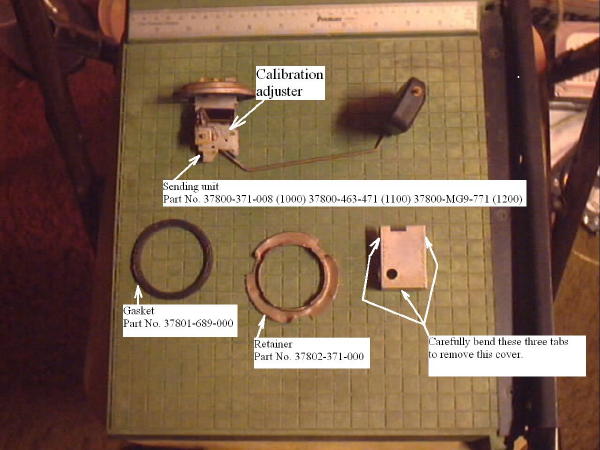
2. Using either a special Honda steering head bearing adjuster tool or a channel lock pliers, carefully remove the locking ring, sending unit, and rubber gasket. If the rubber gasket appears deteriorated and leaky, replace it with a new one. If it’s still in good shape, clean it in some fresh solvent or some soapy water and set it aside to dry. Refer to the photos below for any Honda part numbers as they apply to your Gold Wing. Shown below is 1982 GL1100 Standard, but part numbers for your particular model might be different.
Photo courtesy of Howard Halasz. All rights reserved
3. Pour approximately 2 cups of muriatic acid into a suitable non-aluminum container. An empty plastic Folger’s coffee can will do just fine!! You can buy a gallon of muriatic acid from most retail hardware stores. USE ONLY OUTDOORS OR IN A WELL VENTILATED AREA AND TRY TO AVOID BREATHING THE FUMES!!
4. Bend the three little tabs to remove the cover from the sending unit.
Photo courtesy of Howard Halasz. All rights reserved
5. Dip the sending unit, sheet metal cover, and locking ring into the muriatic acid for approximately 30 seconds.
6. Remove the parts from the muriatic acid bath and rinse with water from your garden hose.
7. To prevent instant rust, dip all the parts into some fresh gasoline. Then reassemble everything in reverse order that you disassembled. Carefully fit the little sheet metal cover over the sending unit and bend the tabs back to lock it in place.
8. Connect an analog (not a digital) ohm meter to the terminals on the sending unit. The needle should swing smoothly as you move the float up and down. If the needle doesn’t swing, make sure that your ohm meter is turned on and calibrated and try again. If it still shows no swing, you might need a new sending unit. You can use a digital ohm meter to make sure that your sending unit is within the following factory specifications: 1975-1979 GL1000 — 65-75 ohms empty, 10-15 ohms full 1980-1983 GL 1100 — 75-80 ohms empty, 6-10 ohms full 1984-1987 GL1200 — 101-110 ohms empty, 43-52 ohms full.
9. Install the sending unit into the tank, making sure that the arrows in the locking ring and fuel tank point to each other.
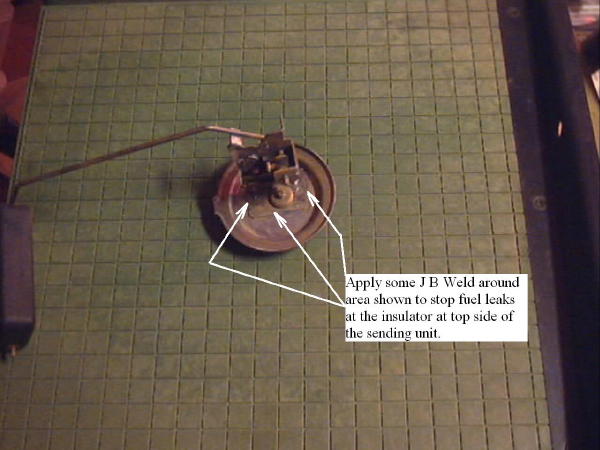
10. Fill the tank and check the sending unit for leaks. If the paper gasket below the insulator is leaking, the leak can be fixed with some J B Weld®. (See photo below)”
Photo courtesy of Howard Halasz. All rights reserved
Howard Halasz, Wing World Technical Contributor – Houston, TX
See also: Tech Tip: 7 Volt Regulator Problems


My bike had a wire from the sending unit to a 5 amp fuse in the fuse box. Fuel and temp gauges worked for a few rides but then the fuse blew. I changed it a couple times but kept blowing. I touched the wire to positive battery terminal and a spark came from the 3 yellow wire plug on the left of battery that I think goes to rectifier. Now gauges don’t work and that wire no longer sparks on anything. Not sure what to check or replace.
I shorted the two wires (GL1000 79) and the needle on the gas gauge moved to full, but it did it slowly over around 15 seconds, and it went all the way past the fullest white marking. Is this normal?
Thank you!
Not normal. By-passing the sender should yield a prompt “Full” indication. Your gauge is failing. You should also check the 7-V gauge regulator to make sure you are not exceeding the regulated voltage to the gauges.
See: http://www.randakksblog.com/7-volt-regulator-problems/
Thanks for the prompt response. I will certainly recheck it tomorrow and check the regulator. How prompt should the move to full be?
Thanks Randakk!