You might consider this item: GL1100 Carburetor Repair Manual written by noted GL1100 guru Howard Halasz
This Tech Tip is provided courtesy of Howard Halasz – noted GL1100 Guru. Howard is a frequent contributor of technical columns and other information to GWRRA’s Wing World Magazine.
“Randakk’s GL1100 Master Carb Overhaul Kit includes are the pieces needed to address the details below during a comprehensive overhaul.”
Plenum Details:
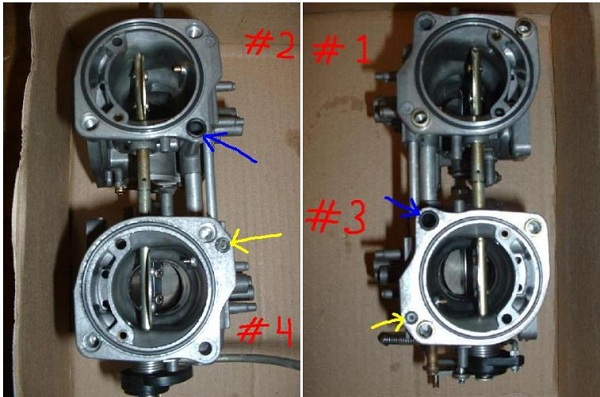
“The main GL1100 carb-to-plenum FUEL seals (large) are identical to the GL1000 carb-to-plenum FUEL seals that come in Randakk’s GL1000 Master Carb Overhaul Kits. There are also two smaller carb-to-plenum FUEL seals for the accelerator pump circuit.
Only two main carb-to-plenum seals are needed and only two accelerator pump carb-to-plenum seals are needed when rebuilding the GL1100 carbs.
NOTE: The two main FUEL seals go on carbs #2 and #3 only and the accelerator pump seals go on carbs #3 and #4 only. The fuel joint pipes will supply main and accelerator pump fuel between carbs #1 and #3 and between carbs #2 and #4. Too many people will put extra seals on the GL1100 carbs in other spots where they’ll fit, but they are not needed.
If you put the fuel seals in the two carbs that don’t need them and leave them out of the carbs that do need them, you’ll end up with major fuel leaks all over the top of your crankcase.
Here are photos showing the correct location of these vital seals:
Left – carb #2 and carb #4 (left carbs viewed from plenum) Right – carb #1 and carb #3 (right carbs viewed from plenum)
Blue Arrows – main fuel seals (main fuel channels) Yellow Arrows – small fuel seals (accelerator circuits)
Note: the side of these special “U” fuel seals with the radiused profile is installed facing the plenum. The flat side of the seals goes toward the carb bodies.
Accelerator Channel “Straw:”
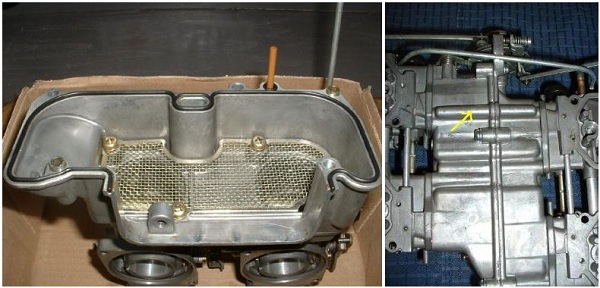
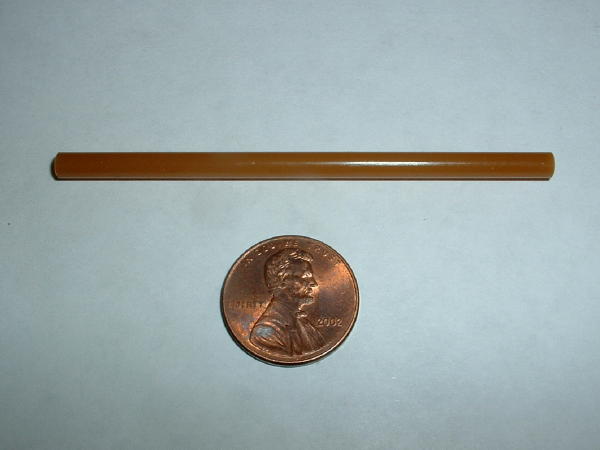
Don’t forget where the little plastic straw goes! The plenum halves have a plastic straw that slides into the accelerator pump fuel crossover channel at the bottom of the plenum halves.
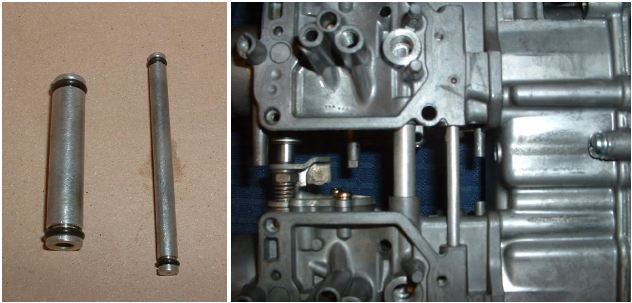
Blue Arrow – Location of Accelerator Channel “Straw” (#1/#3 carb side)
Left Photo: View of Accelerator Channel “Straw” (#2/#4 carb side) Right Photo: Location of Channel
Notice the new plenum gasket and the 2 locating dowels installed on the plenum in left photo.
Put the straw where the blue arrow points. This is the accelerator pump fuel channel…the rear-most channel on the bottom of each plenum half.
The straw is vital. It is necessary is to regulate pressure/flow in the accelerator pump circuit. The purpose of the straw is to reduce the volume of the crossover channel so that you don’t have to work the throttle a million times to get fuel to travel from the accelerator pump in carburetor #3 to the nozzles in the other carburetors. This is particularly important after short lay-ups have allowed normal evaporation of fuel.
OEM “Straw” Dimensions:
Length = 73.25 mm
Outside Diameter = 3.95 mm
Inside Diameter = 1.85 mm
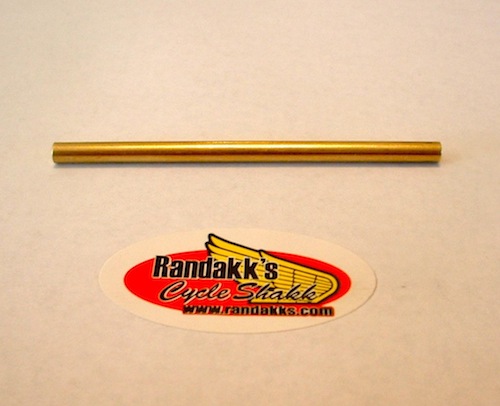
The straw is not available from Honda. If your straw is lost or damaged, I now supply beautiful reproductions in brass:
Randakk Reproduction GL1100 Accelerator Channel “Straw”
Fabricated in Brass. Details here.
Pucks:
“GL1100 carb pucks are pressed in. Do NOT try to remove them!!!”
Idle Jets:
“GL1100 carbs had two different types of idle jets. The ’80 and ’81 carbs have the idle jets pressed into the carb bodies while the ’82 and ’83 carbs have removable idle jets. Do NOT try to remove the pressed in idle jets!!! They must be cleaned in place.”
Removing Stubborn Idle Mixture Screws:
Another problem you may come into when working with GL1100 carburetors is dealing with idle mixture screws that seem to be super glued into the carburetor bodies. They don’t always come out as easily as the GL1000 carb idle mixture screws do. If one of those screws has a broken tip that has wedged into the carb body, then that carb body can be considered trash.
Rarely have I been able to save a GL1100 carburetor with a broken idle mixture screw tip stuck in the idle orifice. There have been several occasions where I had to use a thin cutoff wheel and die grinder to cut a screwdriver slot into a broken idle mixture screw. Then a flat blade screwdriver usually gets the screw out.”
Idle Mixture Screw Details:
When you remove the idle mixture screws for cleaning, don’t neglect to fish out the small O-ring and washer beneath the spring. Often, they will stick in the carb body. If you don’t get them out, the idle mixture can’t be set properly and you will probably damage the fragile tip of the idle mixture screw. You can fashion a handy removal tool from a bent paper clip.
When you install these, the spring goes onto the idle mixture screw first, followed by the washer and then the O-ring”
Correct orientation of GL1100 idle mixture screw, spring, washer and O-ring shown above
Float Level:
The procedure for setting the float levels on GL1100 carbs is essentially the same as the one for GL1000 carbs described here. The only difference is that the float level spec for the GL1100 is 15.5 mm.”
Fuel Transfer Tubes:
Complete disassembly is required to renew the o-rings on the main fuel transfer and accelerator fuel tubes. Don’t skip this step! When rejoining the carb pairs to each other be careful not to bend or distort the soft aluminum tubes. The tubes on the left and right sides are identical.”
“Also, take special care to make sure that the throttle arms are joined with a washer on either side of the arm. Synchronization will be corrupted if both washers end up to one side of the throttle arm. Be sure to put the 2 springs back between the throttle shaft ends as shown photo above. Rejoining the choke shafts is easy on GL1100 carbs because there are no annoying connectors as on GL1000s.”
Air Jet Cover / Guides:
“These are secured with 4 x 16 mm screws which are the same size as the float bowl screws. Unlike the GL1000, there are no gaskets under these.”
4 x 16 mm screws secure the air jet cover / guides
Air Cutoff Valve Rebuild:
“The process is simple and intuitive, but it is all but impossible unless the carbs are completely separated. Unlike the GL1000 carbs, these diaphragms can’t be installed upside down. Be sure to chase all 3 air circuits into each valve chamber to verify that they are clear. Once the individual carb bodies are cleaned and prepped, install the new air cutoff valve kits before the carbs are rejoined to each other and the plenum. The air cutoff valve covers are secured with 4 x 12 mm screws.
On rare occasions, the metal actuating knobs on air cutoff valves are slightly too big for the GL 1100 carb bodies. Check these for fit. If necessary, lightly polish the knobs on the air cutoff valves with a mill bastard file until they fit the carb bodies without sticking.“Fuel Inlet Barb:
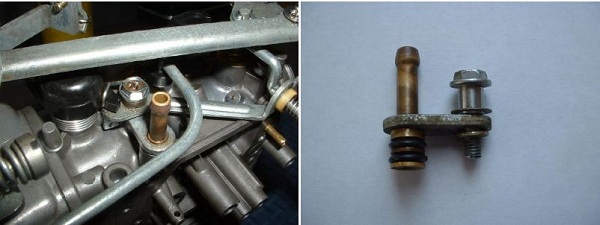
Most people overlook this small detail. The inlet fuel barb has 2 o-rings secured by retainer bracketry which doubles as part of the accelerator pump linkage. The required o-rings are the same exact size that are used for the main fuel transfer tubes. Randall includes all of these bits in his GL1100 Master Kit.”
CV Slide Top Limit Plug:
Be sure to replace the O-ring on the plastic CV slide top limit plug with the new O-ring from your rebuild kit.
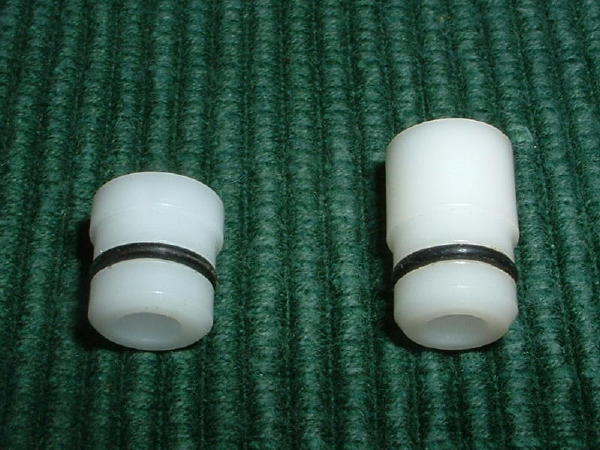
If you are a professional mechanic or have lots of carb parts from various bikes on your workbench, be very careful that you don’t mix these innocent looking parts. Be aware that Honda used different length CV slide top limit plugs on various Honda models of this vintage even though they are all in the same carb “family.
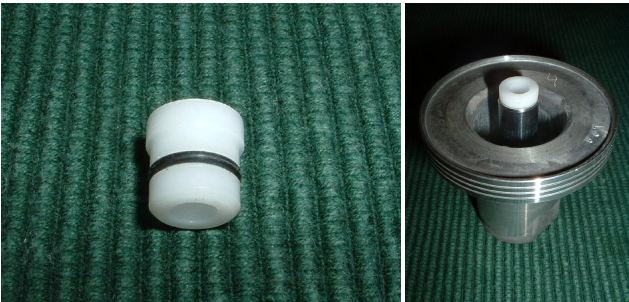
For example, look at the pictures below…the GL1100(left) uses a CV slide top limit plug that is 10.95 mm tall while the nearly identical part from a CBX carb (right) is 16.47 mm tall. A GL1100 with CBXCV slide top limit plugs would not be able to achieve full power as the CV slides would not rise completely under full throttle.
GL1100 CV slide top limit plug (left) – 10.95 mm tall
CBX CV slide top limit plug (right) – 16.47 mm tall
Usually the CV slide top limit caps will pull ring out. They are simply pressed in (by hand) and have an oring seal. If they are really stubborn to remove, they probably have fuel residue that has effectively glued them in place. You can overcome that 2 ways:
1. Boil the carbs in distilled water like this.
2. Carefully heat the area beneath the cap (piston aspect) with a Bic lighter or similar. Let me emphasize carefully…with recognition of the safety hazards of having an open flame near anything flammable.”
CV Slide Cushion Rings:
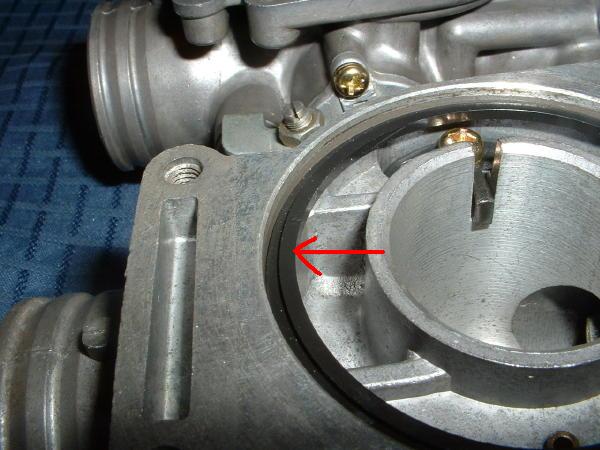
The CV slide cushion rings are installed with the ridge facing UP as show in the photo.
Install with ridge facing UP
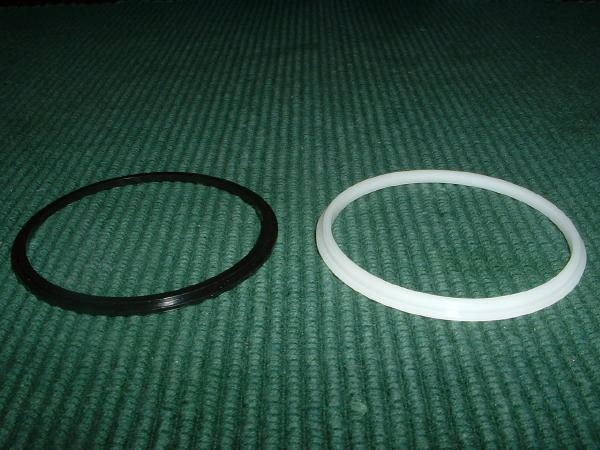
Again, if you are a professional mechanic or have lots of carb parts from various bikes on your workbench, be very careful that you don’t mix these with slide cushion rings from other models.
Another comparison to the CBX…the GL1100(left) uses a CV slide cushion ring that is 2.0 mm thick while the nearly identical part from a CBX carb (right) is 3.0 mm thick. A bike with the wrong slide cushion rings would have serious idle problems!”
GL1100 CV slide cushion ring (left) – 2.0 mm thick
CBX slide cushion ring (right) – 3.0 mm thick
Accelerator Pump Details:
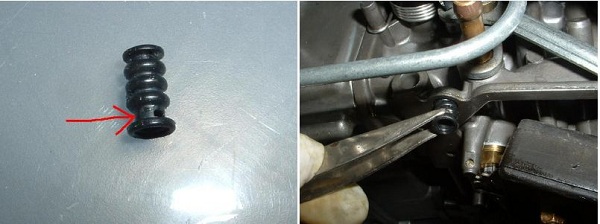
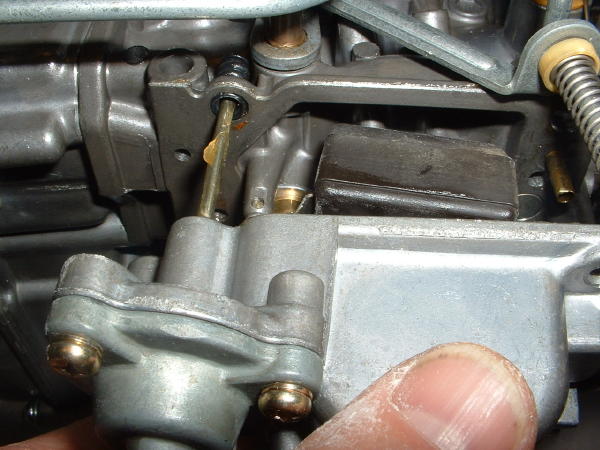
“Install the accelerator dust boot “groove” into the hole in the body of carb #3 as shown before you install the rebuilt float bowl / accelerator pump assembly.”
“Lightly lube the pump rod and insert the rod through the boot making sure the boot remains in position. Be sure the special O-ring is in place adjacent to the float bowl gasket. A slight smear of vaseline will hold it in position.”
The O-ring shown below seals the accelerator fuel passage from the pump to the main carb circuits. Be sure the O-ring stays in place during assembly. Again, A slight smear of Vaseline will hold it in position. Randakk’s Master GL1100 Carb Overhaul Kit even includes an extra spare for this O-ring which often lost or misplaced.”
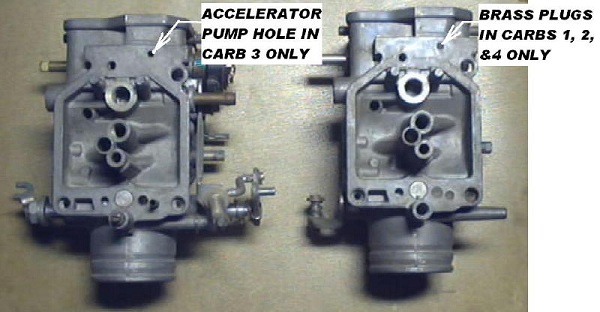
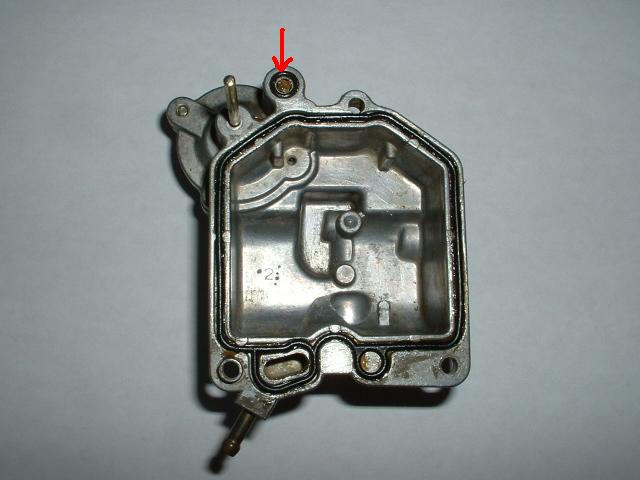
“Carb #3 only has an opening in the carb body for the accelerator fuel path (shown below). The other 3 carb bodies have pressed in brass plugs in that location. Do not attempt to remove these brass plugs.”
Accelerator Pump Adjustment:
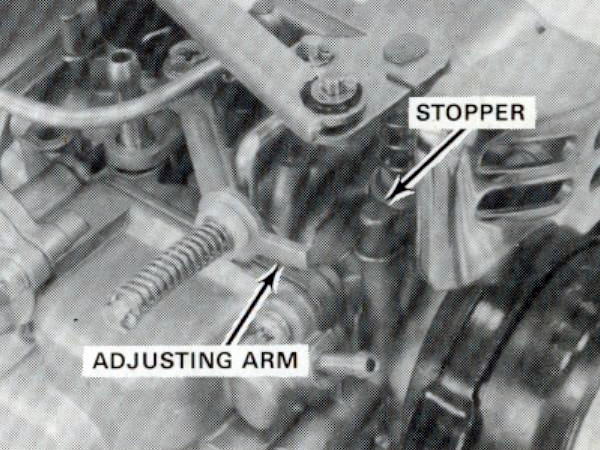
Adjust the accelerator pump before installing the carburetors on the Gold Wing. Measure the clearance between the adjusting arm and the stopper on the carburetor body. The specified clearance is 10 mm (0.4 in). Adjust it by bending the adjusting arm. See photo below.”
Float Bowl Details:
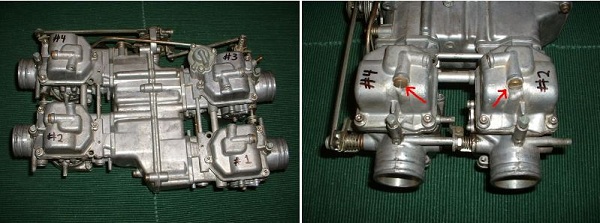
Be sure to use three 4 x 16 mm screws to secure each float bowl. If you mix up the screws, and use the 4 x 12 mm screws intended for the air cutoff or accelerator pump cover, you risk stripping the threads in the carb body as these screws are too short for the job!
Also, be sure you orient the float bowls correctly as shown in the photos below. It’s impossible to get the float bowl for carb #3 in the wrong spot since it contains the accelerator pump. But, the others can be mixed up. The correct placement results in the float bowl drain screws oriented inboard. This makes subsequent fuel bowl draining much easier.”
Howard Halasz, Wing World Technical Contributor – Houston, TX
You might consider this item: GL1100 Carburetor Repair Manual written by noted GL1100 guru Howard Halasz
If you want to find the best selection online for motorcycle parts, visit our stores below:
www.DimeCityCycles.com | www.Z1Enterprises.com | www.Randakks.com | www.MikesXS.net


Simply wanna remark that you have a very nice site, I
like the design it really stands out. I’ve review about that in my web Bonanza88 thank you
Thanks Vivi! We really appreciate the kind words. I’ll be sure to pass them along to the dev and marketing teams who work hard on it.
What is the estimated labor time to rebuild and reinstall the carb on the ’82 GL1100 Interstate?
Hey Skylar, this really depends on skill level and experience. These carbs are complicated and can take a competent hand a day to go through. If you’re unfamiliar or learning you might need to allocate a weekend or two.
Hello,
I just resurrected a 1983 GL1100 that sat for 22 years. It was in very good condition other than frozen brakes and seized up carbs.
I rebuilt the carbs using a pretty comprehensive kit I bought on line. I am a reasonably experienced bike mechanic and I had no trouble putting the carbs back together, but I did not split them of the plenum as I had no o rings for that. I reused the main jets after cleaning them well, and replaced the pilots and idle needles. The bike started instantly and idled well. (I bench synchronized them while they were out.) It runs very well up to 3000 rpm, but then accelerates slowly with a miss or stumble. When I put a heat gun on the heads the front two are the same, and the rear two are one about 8 degrees cooler than the fronts and one 8 degrees hotter than the fronts. All the plugs show a nice tan color except number three (the hotter one). That plug is sooty, and I would say unburned fuel not oil. I have great hot spark at that cylinder so I guess I need to pull the carbs again, but I am wondering what I might have missed? The parts of a carb that cause trouble are usually the low speed or idle circuits, and not the main but it seems like I might be dumping in too much fuel?
Any suggestions would be appreciated.
I should add that the floats and valves and seats are new and set correctly.
In your GL1000 Carburetor Overhaul Video DVD you may have suggested not to separate carb#1 from carb#3 and carb#2 from carb#4 do to the possible difficulties to put them back together without bending or distorting the soft aluminum transfer tubes connecting each couple of carburetors. However, I think that my 1983 GL1100 deserves to have its throttle felts renewed unless I could not find any “leak” they may have introduced to the carburetor(s).
So…how do I check for leaks on each couple of carburetors after they have been separated from the plenum? Bottom line, if I don’t find leaks in my 39 years old carburetors, may I ignore replacing their throttle felts?
Than you – Pier Bassi, Minneapolis, MN
Just bought a 81 gl1100 and it set in a shop for 5 years without being started what do I need to do to get it running
I have a 1981 gl1100 interstate, carbs have been rebuilt but it is sluggish at take off. I checked vacumn advance and have no vacumn at port. After throttling engine up it levels out some,just wondering what kind of vacumn should I have.I can put vacumn on hose and engine will idle up. Thank you.
Hello. I have a problem I can’t seem to figure out. I have a 1981 gl1100 that I did a partial rebuild on all four carbs. Standard rebuilt kit including idle and main jets, air cut offs, etc. I cleaned the carbs as best as I could without splitting them apart (as in separating from the plenum). Choke circuit appears to be working. No fuel spilling in the plenum. Problem is the #1 intake is cold and actually has condensation on the outside. Exhaust is cold as well. Changed plug and has spark(using a spark checker). Any ideas would be Greatly appreciated.
Hi mark,did anyone get back to you about this problem as I have the very same thing happening to mine 👍
The above when you say Honda GL1100, is that an 82 Goldwing aspencade?
Thank you
Hi, can be replace the carburator of GL1000 (1979) for a carburator of GL1100 (1982-1983)?
I have a 1980 GL1100. Got to you warning about the idle jets being pressed into the carb bodies and then read yours statement that they must be cleaned in place. Given that there are holes that have to be cleared in the body of that jet, how exactly do I do this?
Thank you to Randakk for posting this blog! I should have bought the book too when I ordered the master rebuild kit. Long story short I was able to find why my carbs were pouring out gas. I missed an oring on the no 3 carb. Thank you again and your products are a1
Good morning!
I just finished the carb overhaul on my 1980 gl1100. It appears it is leaking where the plenum halves join. I am wondering if I should have put an o ring in where the straw goes along with the plenum gasket? Thank you for your time.
Question for you. I got the master rebuild kit from you and did the overhaul on my 1980 gl1100 goldwing. I had it running today and had a gas leak. My question is where the plenum halves meet and the straw goes through, is there supposed to be an o ring around the straw plus the plenum gasket?
Some people alternatively pay a lot money at one time to boost the chance of profitable.
The system the place betting cash is through your bank is secure to work with, and the
transaction is all the time between your account and the Ladbrokes.
Simple system described in steps. Many are simple people simply struggling to get by.
This information gives all the info you want to get into the sport.
However the thing is that to extend your chances of successful, you want to place a bet every single day.
As an alternative, you are able to get all the information you need from that very same site.
As long because the owner of the Bitcoin looks after it properly using
a high-security wallet and two-issue authentication, it will likely be extraordinarily difficult for anybody else to get entry to their funds.
At any point, nonetheless, the bookie can soar in and make changes to the lines that can be found to his gamers if knows he
will likely be getting heavy one sided motion.
If you’re one of those individuals who doesnt like cats,
Im sorry to hear that. For the above example, it would appear to
be -7.5 (-110). Different players can legally purchase Mega Hundreds of thousands Lottery tickets online by way of the lottery
agent you see mentioned above. As an example, MEGA Thousands and thousands is a multi-state lottery and it operates in 11 states.
As an example, you would not need to choose just any race horse in hopes of successful a wager.
5. Bet on sports activities by inserting your wager. When you click on the sport of your
choosing be sure you bookmark the web page so you’ll all the time have essentially the most current and up to date sports
activities betting odds at your disposal. On this methodology, you might select a low number from the given set comparable to 1-50 like 1.
Some successful numbers have two consecutive numerals, although not all the time.
And then with the time you saved do something extra productive than you’ll have
accomplished appearing like a poor person.
I have a a real head scratcher; I have an 83 gl 1100 with 40K on it didn’t run on arrival and new timing belts later it will run. I went through carbs and now it will seemingly run fine out to about 5,000 rpm and then you have to choke hell out of it to get any more. Have gone through carbs until I am blue in face and can’t find problem. I do not have the rubber plugs that came with the carb kits installed and am wondering if that could be my problem. Any suggestions would be greatly appreciated.
Send a copy of this question and a picture of your carbs to: customerservice@randakks.com
There are no “Rubber plugs” in GL1100 carbs. It’s possible that you have GL1000 carbs on your bike?
Hello Randakk, I have an 1982 Honda Goldwing Gl1100 I picked up from a person who was over their head in reassembling the bike. I am a master Mechanic in the automotive field of over 41 years. I have not worked on Motor cycles before but then there are many automobiles I have never worked on also. I got this bike disassembled and have come along way from where I started. This bike has sat many years with old fuel in system. Fuel tank was cleaned, carbs overhauled due to external fuel leaks, (jets plugged up) and it runs pretty good. I have replace fuel pump with new Honda pump and the fuel pressure is good cold. But when the engine is warm the pressure drops below 2 psi. Sometimes it is below .5 psi. It does loose power and doesn’t want to accelerate with a load. I can clear it out revving without a load. I noticed this especially when the pressure was low. Today I noticed the same lack of power under load and accelerating. I was necessary to down shift. The pressure was about 1.8 psi. Again the pump is new, the carbs have been gone through 5 times with the most improvement the last time with float replacement. Cold pressure this morning was 2.4psi. A few minutes in the ride, it dropped below 2.0 psi. I have ordered an electric fuel pump rated 1-4 psi. I am not sure if this will work. I also noticed about the tube cross over for the accelerator pump. I remove this the first time I went through the carbs. Will this cause a loss of power during the heavy acceleration up hill? I have a semi permanent fuel pressure gauge installed in pressure side of pump so I can monitor fuel pressure when it acts up. I am scratching my brain here.
Thoughts.
I suspect either your new pump is defective (happens) or your gauge is very inaccurate. I would bet that the pump is bad.
Check your gas cap make sure the vent is working on the gas cap sounds like your vapor lock or have a vacuum on your tank or you’re running the longer you run the more vacuum in the tank
Any idea when the fuel straw will be available again. I seem to have misplaced mine and tracking down brass tubing is crazy hard. I can either find the right outside or inside diameter but not both. I have a tube cutter and know how to make these. Any help will be greatly appreciated.
Please send this question to: customerservice@randakks.com
So Grateful for these Essential Pointers for Reassembly, especially where that “straw” goes. Nothing like the customer insisting, against my STRONG recommendation that your kit be the one we go with, on getting a cheepass kit from eBay that – no surprise – had components that did not fit. Of course in the Weeks that elapsed between taking the suckers apart and FINALLY getting your kit, I had forgotten where some of these things go. And then there’s the Proper location of the carb-to-plenum fuel circuit O rings. Boy, that would’ve sucked had I gotten that wrong. Thanks again!
Charlie: Thanks much!
1. Thanks for the grinding wheel tip on how to get a stubborn, broken idle mixture screw out. Worked great for me, and i have just reused that screw with the new slot cut in it. No problems at all with it.
2. Have replaced head gaskets every 6 or 9 months for years (with an expensive head rebuild each time) because the gaskets (OEM) have been chewed up on the engine side between the cylinder sleeves. The shop that rebuilds the heads (cyl. head rebuilding is their business) tells me this is due to early spark or air leak. Both heads and block are flat. Properly torqued. OEM head gasket. I’m a Christian. Have not been kicking the dog.
Since spark is electronic (1981 GL1100), and the vac. hose to the “points” (not points, I know) maintains vac. (neither hose or diaphragm leaking), I’ve presumed air leak. With my synchronizer the vac drawn at idle is VERY low (5 or 6 or 7 psi, changes as it should with throttle).
Found with brake cleaner there is a big air leak at the throttle shafts of both rear crabs. Rebuilt the carbs 5 or so years ago, but could not remember anything about seals. So, was about to see if there was some way to replace the seals in situ (since the carb assembly is such a PITA to remove), but then saw your post showing these carbs have a hole and intentional air “leak” at the shaft.
So now I’m stumped. No other leaks seem important enough to change idle speed when sprayed.
Blow the bike up?
Answer to the felt question is here: http://www.randakksblog.com/replacing-felts-on-honda-gl1000-gl1100-gl1200-dohc-4-cbx-cx500-etc/
There is no reason your head gasket repairs are not lasting longer! Something is not being done correctly! Review this information: http://www.randakksblog.com/gl1000-gl1100-gl1200-head-gasket-details/
I’ve got a fix with the broken mixture tip problem. For my bike, I had a new mixture screw fabricated with modified dimensions so the end fits into a 1/16″ hole, with a tapered tip. It uses the same spring and washer arrangement as original. This allows you to drill out the broken tip using a 1/16″ drill bit. Then use the re-designed mixture screw (with the modified “fatter”/tapered end).
It saved my carb. Nobody should have to get rid of an otherwise good carb body because of this problem. I can get the dimensions or mixture screws to you.
Great. Please email me the details on this fix. Use: randakk@randakks.com
Thanks.